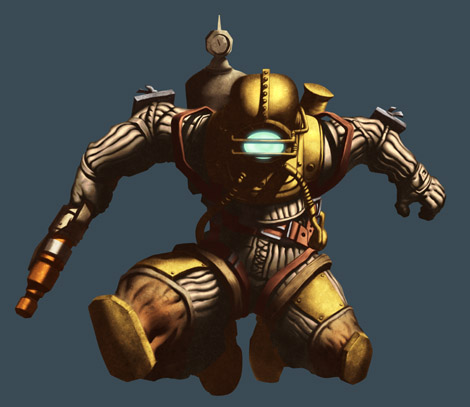
In this walkthrough I explain how I used Photoshop and a Wacom Tablet to paint a character from the new videogame Bioshock for GamePro Magazine. This walkthrough gives you an overview on how to use textures in a digital painting. Enjoy!
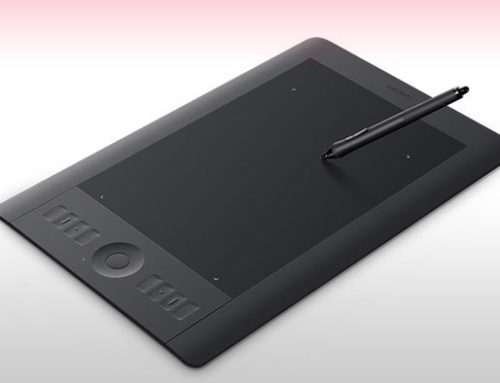
I painted this piece over line art by Joe Ng (another artist on the UDON team) for the August 2007 issue of GamePro Magazine. This piece required extensive use of textures because of the rusty metal elements on the character’s suit. I used Photoshop 7 and a Wacom Intuos tablet. My favorite tablet is the Wacom Intuos 3 6×8. See my tutorial on choosing the right graphic tablet.
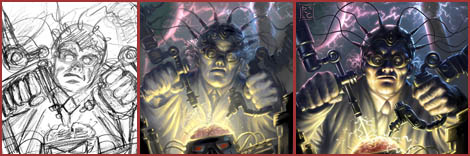
Step 1 – Line Art

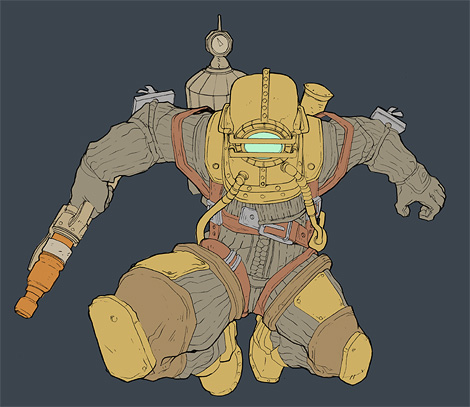
Photoshop Tutorial – Bio Shock – Line ArtThis was the easiest part: I just opened the file and there it was! Great line art from my fellow UDON artist Joe Ng.
Step 2 – Flats
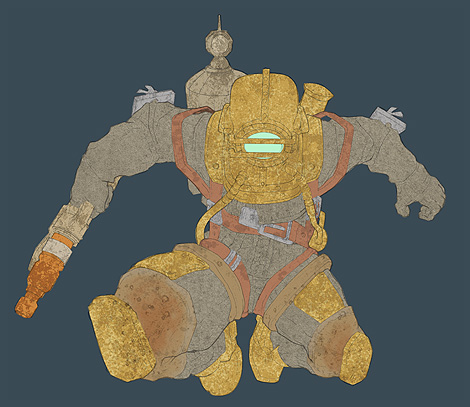
A fairly complicated piece like this one, requiring several different textures, calls for an extra step in the process: Flats. As explained in my previous tutorial on how paint a Wonder Woman pin up, flatting is a technique borrowed from the comic book industry. In simple terms, each area is filled with a base color (metal, belts, clothing, etc.) to serve as a basis for the following coloring steps. I usually flat using different layers, one for each element of the figure. For example, in this case, I add all the metal parts in their own layer (see the yellow-ish areas in the image above); one layer for the clothing (the grey areas) and so on.
Step 3 – Textures
Textures are what makes this piece in the end. The trick here is to add several different kinds of textures and to have them applied to only certain areas (i.e. the helmet). A simple way to achieve this is as follows:
- Create a new layer (let’s call it “my texture” for simplicity) above the layer you want to apply the texture to.
- Open a texture image and copy and paste it into the “my texture” layer.
- Set the texture layer blend mode to Overlay.
- Now you can see through and how the texture looks as applied on the layer below.
- Change the texture layer opacity as needed. I usually have it at 20% or less.
- Move the texture around to make sure you find the best fit.
- Assuming you have a flat of the area you want to apply the texture on already on its own layer, select its transparency.
- Select the texture layer.
- Add a layer mask: Layers –> Add Layer Mask –> Reveal Selection
Now the texture covers only the area that is supposed to. Using a layer mask gives you flexibility. It’s much better than simply deleting the area of the texture you don’t want to show because if you do so, you can’t go back and move the texture around later on and make adjustments.
Step 4 – Shadows
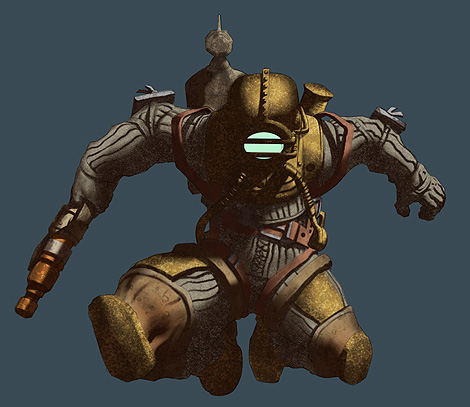
Once happy with the textures, I painted the shadows on the figures using an adjustment layer set on multiply. See my Wonder Woman tutorial for details on this technique. The shadows layer is above all other layers in this case. See a detail below:
Step 5 – Details
In this stage I refined the character, added more shadows and details. I left highlights for the next step.
Step 6 – Highlights
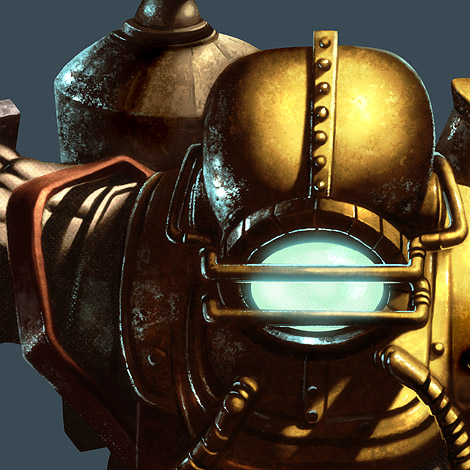
This is where I really had fun! I like to paint highlights at the end. It usually is the most satisfying part of the process. Usually, adding highlights and incidental light really brings my paintings to life.
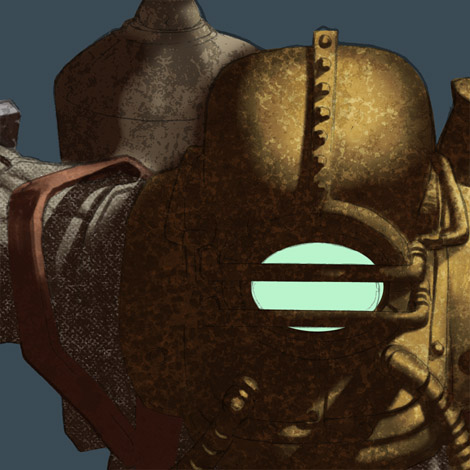
For highlights, I add a new layer above all others and paint the details in, usually zoomed in at 200%. I used several rusty metal custom made brushes I created earlier and some I had to create specifically for this piece. See close-up below to see the results:

Hello,
this picture is great, it is interesting to follow your worksteps.
How many hours you needed to colour it?
Hello Christoph,
It took me about 3 hours for this one. I had to paint extra fast, being on a super tight deadline (as usual).
Thanks for your comment!
This is a great walkthrough on a digital painting process intended for publication. 🙂
What was the resolution (and dpi) of this image?
PS: I am posting link to this over at a digital painting forum 🙂
Hello Vyoma:
Thanks!! This was painted at 300 dpi. The image was about 3000×3000 pixels.
Beautiful artwork Robert!
3 hours? Thats really fast.
Hmmm. 10″ by 10″.
Roberto, thanks for the info. 🙂
Woe this is really great painting it captures the look of the big daddies in the game down to the last detail. I wonder if you would make the brushes you use in this painting for download to try this?
..wowww, i really find this tutorial very helpful, thanks Roberto.. =)
Hi Roberto!
I was curious about the textures you used. Are they shiped with photoshop or did you create your own?
Thanks
Derik
Eli: Thank you so much!
Christoph: Faster than usual. I wish I had more time to work on it but I had an insane deadline to meet.. and in fact, had to skip sleep that night to get this piece and others done in time. Ah.. the life of an artist…
Vyoma: Yes.. pretty big. Clients nowadays want the artwork super-sized.
Caesar: Yes, all custom brushes. I will share them on my site soon. I’d love to see what you guys come up with them.
Ronald: Awesome. I’ll do more and more 🙂
Derik: Some I made myself, some I took from a great texture collection from 3d total. Photoshop comes with a few textures, not much to speak of. There is a great free texture site that I would recommend: http://www.cgtextures.com/
Roberto, it’s awesoe that you take the time to teach us this stuff when those so few in the industry that want to give up secrets. I really appreciate you doing this on a regular basis. Any chance you’ll put out a tutorial on skin tones for various ethnicities and how to draw various backgrounds using photoshop and a wacom? Thanks lotz.
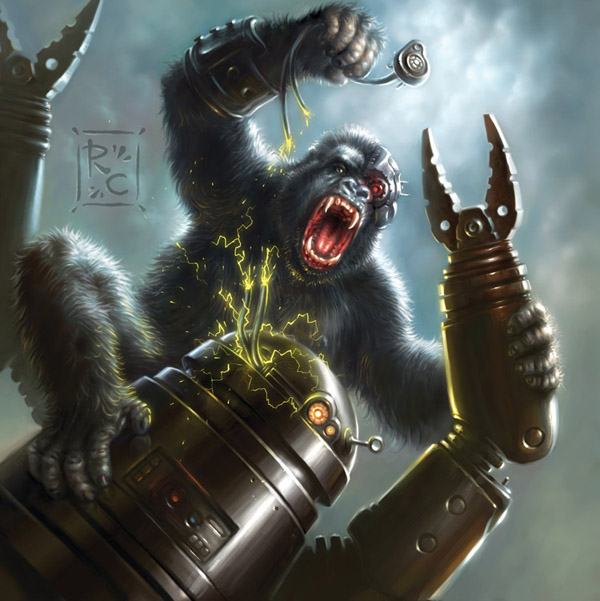
It’s very good, but am I the only one who noticed that that isn’t what a big daddy looks like? Looks like a regular diver to me.
There are two kinds of Big Daddys.
In this case this is “Rosie”.
The other one is “Mr. Bubbles”.
Amazing work, man!
Great! Please post more techniques and resources for digital artists to learn techniques and tips!
Thanks,
Eric
Cheers from Madrid, Spain.Thanks for sharing your techniques.Pretty useful.I must admit I’ve learned more than a couple of things reading this.
Keep up with the good work.
Well, I liked it better in solid colors, but that NEVER changes the fact that you have one amazing talent. Not greater than mine though (I’m very primative :P…seriously)
Yep. I enjoyed this very much and found it inspiring.
Seeing the brushes would be interesting – to compare them to the brushwork.
Please post more tutorials.
cheers
Andrew
I just discovered your blog and bookmarked it. Nice tutorial!
Thank you ^^
it great picture
thank you for it
Man, your art work is just AWESOME! I wish I’ve your skills… keep up the good work.
It’s very good feel.
I am new to digital art, and to this site. Can you suggest one book that would give a beginner good basic information on how to do this? Thanks
Very impressive work! great work on a very informative tutorial! I would be honored to have you featured as an artist in my blog.
Don: I would google for tutorials online and practice and practice and practice. As for any specific books.. I can’t suggest any, but I think you could find all the information you need and more by browsing forums like cgtalk.com or conceptart.org.
Emmanuel: I’d be glad to be featured on your blog 🙂
Thanks everybody for your comments! Keep them coming 🙂
You’re a very inspiring artist, sir, and just browsing through your blog has my jaw hanging open in awe.
A question, though; I’ve seen that you’ve been working with rather high resolution and a large canvas – may I ask what are the specs of the computer you’re using? When I do paintings that large my laptop slows down so much it’s annoying. Thank you!
Anna: Thanks for such kind words 🙂
As far as the resolution, I work at 300 DPI.
So, let’s say, a regular page sized at 8×11 would be about 2400×3300 pixels wide. Depending on the amount of memory and processor type of your laptop, you might experience slow performance. I made sure to have 2 gigabytes of memory, to allow for enough space for Photoshop and Windows. I have a dual processor cpu, 1.6 ghz. The graphics card is nothing special.
oh man, this is so nice, especially your highlights.
i will never get that good.
i forgot one:
your tutorials are the sex, im really saying it!
looks pretty decent at the beginning, but the result – simply stunning!
I can only agree with all the others here! You can really handle your Wacom and the programs. Me myself I’m still practicing as much as I can.
Keep them Tutorials coming and send your friend Joe Ng some greetings for the great linearts. 😉
Keep up the good work!
Hola Roberto, de donde eres? Buenisimo el tutorial,soy ilustradora tmb,muchas gracias.
Hi,
I suppose that when some people read “digital art” they think : “the computer did it”.
They seem to forgot that a computer can’t “create”.
I really like watching fantasy art, namely admire the way that the artists can depict light on their scenes.
Not forgeting that artists working on fantasy art are often good draughtmen/women.
Kind regards,
José
Kick ass dude, can you do a bouncer and a spider splicer please that would the best thing in the world. Thanx m8
You just don’t know how much this has helped me!
Thank you for this!
Amazing site, Roberto…Thanks for your time…
Keep up the good work
Very Very Very Good Work
I see some encoding errors in your post: http://static.bwerp.net/~adam/2008/09/19/encoding.gif
This tutorial is a great idea and very helpful. I especially liked the process you follow for the LOTR portraits. What inspires you to use the computer over traditional media?
I agree with your comment about light. I find it a continually fascinating topic to explore. If you look at the expressionists and then look at artists such as Pyle, Wyeth, even the Hildebrandt brothers, you can really see the richness and expression that is possible with light.
Great tutorial, very to the point, beautiful work!
[…] Bioshock Videogame Painting Creator explains how to use Photoshop and a Wacom Tablet to paint a character from the new videogame Bioshock. Visit Tutorial […]
[…] Pintura do jogo Bioshock O criador explica como usar o Photoshop e uma Wacom Tablet para a pintura de uma personagem do jogo Bioshock. Visite o Tutorial […]
You did a great job! The light and shadows on this image is what makes the picture truly pop, and the details are amazing.
[…] The Art of Roberto Campus " Blog Archive " Photoshop Tutorial: Bioshock Videogame Digital … – […]
Man…your site is great.
I have trying to find how to make a graphic art such as your Wonder Woman for so long.
Now that you revealed such technique for us, man your works are awesome..
This is a great way of doing things Roberto. Clear, precise and methodic. And all with a great result. Compliments.
How do you (or in this case Joe Ng) create good quality line art files? Are they JPEGs or are they IA files? I use fine tip markers to create clean drawings and then scan them as JPEGs, but it seems to me that AI files would be easier for the next person (like you) to use.
[…] Bioshock Video Game Digital Painting […]
Why did you choose to use photoshop? This might be a stupid question but why doesn’t anyone paint in illustrator? It also has brushes but a limited amount of filters and lighting effects. But the best thing would be that your image would be vectored. So you could scale it up as much as you want without distorting the image. So why don’t digital artists use illustrator?
[…] 40. Bio Shock Digital Painting […]
[…] 40. Bio Shock […]
[…] 40. Bio Shock Digital Painting […]
[…] Videoshock video game digital painting […]
[…] 40. Bio Shock Digital Painting […]
wow roberto your art is awesome,thank you for sharing your techniques with us,i am a drafter and i really enjoy your tutorials.
[…] Digital Painting for BIOSHOCK […]
Does anyoone know where the wonderwoman tutorial is?
This is dope stuff.
Wow, it looks like it’s 3d!
[…] 6. Bioshock Videogame Digital Painting by Roberto Campus […]
[…] BioShock Videogame Digital Painting […]
[…] Bioshock Video Game Digital Painting […]
Nice tutorial. Thanks
[…] Bioshock Video Game Digital Painting […]
Robert!
This helped me out a great deal as well, thank you. Also, not sure if anyone already asked this but what brush size do you use when you’re painting? Or does it vary?
Hey nice work over there..
your steps giving me much more knowledge about photoshop :DD
[…] A great colouring tutorial showing how Roberto Campus used line art by Joe Ng to create this highly detailed Bishock artwork. Click to view tutorial… […]
[…] and a wacom tablet. here’s 2 tuts i found that kinda explain the shading techniques in photoshop: The Art of Roberto Campus » Blog Archive » Photoshop Tutorial: Bioshock Videogame Digital Painting The Art of Roberto Campus » Blog Archive » Photoshop Tutorial: Wonder Woman Pin Up Digital […]
Hi Robert, great picture! I did have a couple of questions for you, though.
What did you do to the line art layer after you created the color flats and textures? By step 3, the line art does not appear as bold as it did in the beginning. Did you merge the line art layer into anything or change its opacity? Thanks!
Many thanks for this tutorial.
I’m trying to teach myself the art of digital painting and this has helped me a lot.
Cheers from South Africa.
This is amazing 🙂 I wish I could create art like you
Roberto hay alguna posibilidad, sin importar mi talento digamos, de que logre hacer un trabajo tan bueno, sin usar un tableta grafica?
The highlight on the left of the helmet is fantastic, it really brings out the texture you applied to it in a believable fashion.
Great tutorial. It explains a lot without entering in many details.
Whoa… Wicked! Thanks heaps for posting this. It is really inspiring. I tried illustrating a mascot design for a project of mine and couldn’t seem to get it right. In the end I decided on getting some professional help. The designers at http://www.mascotdesigncorner.com managed to realize my vision of illustrating a character design that was above expectations. I highly recommend them. For the price I paid it was indeed a steal. I guess I am not good at designing at all. Anyway, thanks for providing a source of inspiration I might add. This site rocks big time!
[…] 40. Bio Shock Digital Painting […]
[…] 40. Bio Shock Digital Painting […]
[…] 40. Bio Shock Digital Painting […]
[…] here for a full tutorial on his painting process (I guarantee you ladies and gents will be impressed!) […]
Seriously awesome tutorial — it’s fascinating to see how the layers stack to create something so realistic.
[…] Bioshock […]
[…] 12.Bioshock Videogame Digital Painting […]
Really awesome, you did nice illustrator work.
As i designer i really appreciate this one.